CLASHED MORGAN FEATURES - HOW THOSE FEATURES WERE CREATED
 Bottom
TABLE OF CONTENTS
Click on a photograph to enlarge, then click on an area of interest for maximum detail. To return, click on the "Back Arrow".
OBVERSE CLASH LINE
The following photographs show what an Obverse Clash Line looks like. The Clash Line(s) can appear exiting into the Field from any point along Lady Liberty's Jaw and Neck Line. This feature is created by the clashing of the Eagle's Right Wing.
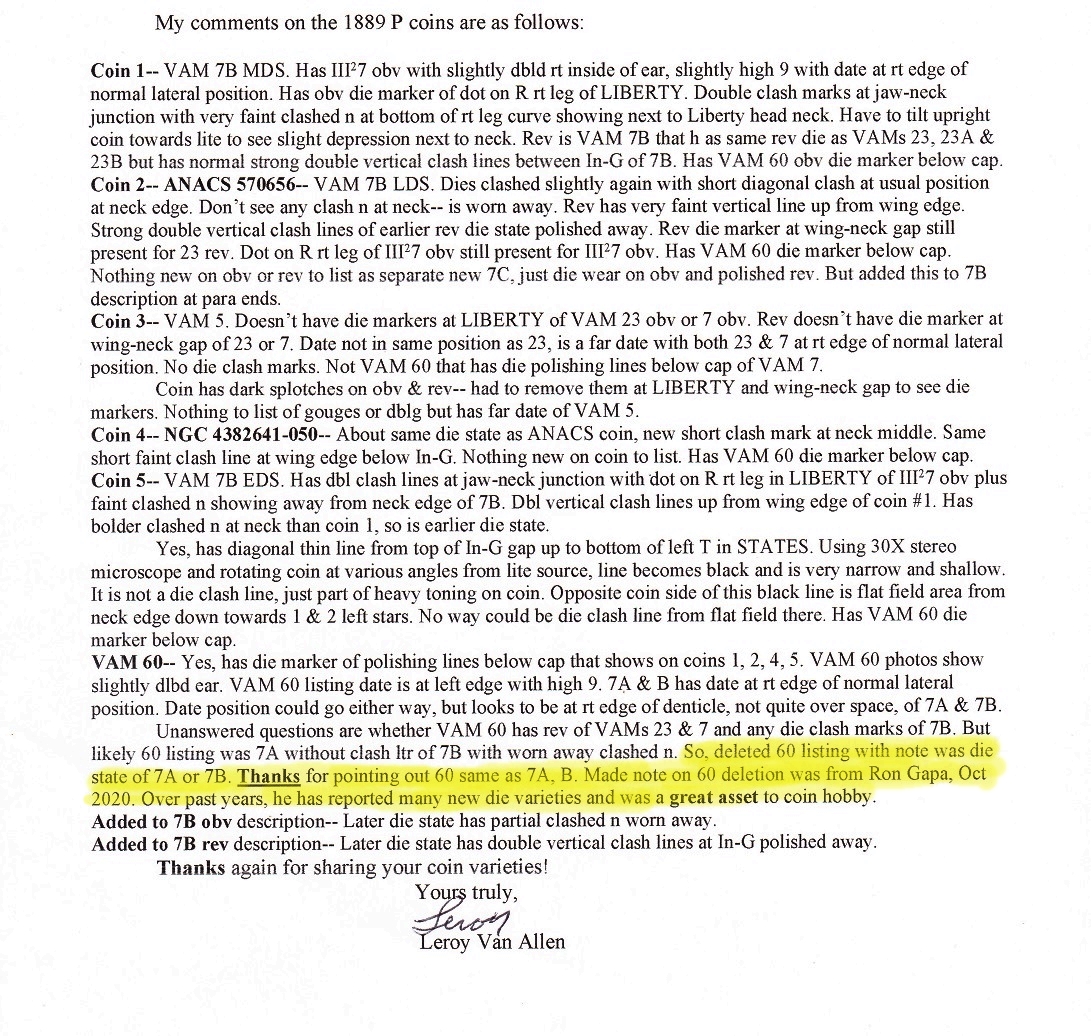
Comment Section
 Top Bottom
- There can be any number of clash lines seen on a Morgan Silver Dollar. If you see one clash line on the Obverse, only one clash event occurred during the production lifespan of the Dies. If you see two clash lines, two separate clash events occurred.
- The VAM-15A comes in a Triple Clash Line version. However, the third clash line obscures the partially incused "n" found on VAM-15As. Consequently, that version reverts back to a VAM-15 because there is no visible incused "n".
Comment Section
Top Bottom
- The VAM-35A comes in a Double Clash Line version.
REVERSE CLASH LINE
The following photographs show what a Reverse Clash Line(s)looks like. This feature is created by the clashing of Lady Liberty's Neck Line.
Comment Section
Top Bottom
- The Clash Line(s) can appear exiting into the Field from any point along the Eagle's Right Wing and heading toward In of In God We Trust. In some cases, a clash line can be seen heading toward the G in God.
Comment Section
Top Bottom
- IMAGE 4 is an example of what has been described as a "Railroad Tracks" clashing.
Comment Section
Top Bottom
- Image 1 and Image 2 show a double clashed Reverse t from different angles. Two separate clash events created this feature.
COUNTER CLASHES
The following photographs show what Counter Clashes look like.
Comment Section
Top Bottom
- In order for a counter clash to be created, two separate clash events must have occurred during the minting lifetime of a Die.
- When the subsequent clash event occurs, the clash features of that event are transferred back to the source Die; but, out of alignment. The out of alignment factor will determine how far a counter clash will be from the intentional design element of the source Die.
- In some cases, a counter clash may be confused with doubling.
Comment Section
Top Bottom
- Both images are the same, but taken at different angles. They show a single counter clash running between the Nostril and the upper lip.
OBVERSE LETTER TRANSFERS
The following photographs show Letter Transfers that clash events produce.
"G" TRANSFER
Comment Section
Top Bottom
- This G transfer is clearly seen and is one of many clashed features found on this magnificently clashed Morgan Variety.
- The G transfer is created by the clashing of the G in God, which is located on the Reverse side of the Morgan. When you see an Obverse Clash Line exiting from Liberty's Jaw at a point above where the Jaw and Neck Line meet, you should carefully examine the area along Liberty's Neck Line to see if a G transfer has occurred.
- The photos posted above were photographed by Andrew Wojtowich, a Silver Dye Photography member. And, I thank him for his contribution to this Project.
"N" TRANSFER
Comment Section
Top Bottom
- Obverse letter transfers are "incused", meaning that they are punched into the "Field" by the clashing of a Reverse "Device".
- An incused "n" is created by the clashing of the "n" in the first word of the Reverse Motto, In God We Trust.
- An incused "n" can appear along Liberty's Neck Line or off the Neck Line. Where to look for such transfers, depends on where a Clash Line is seen. The existence of a clash line does not guarantee that an incused "n" was created by the clash event.
- Both of these VAMs have very clear "n" transfers. Sometimes there is very little left of a letter transfer to positively identify the feature without careful examination.
"T" TRANSFER
Comment Section
Top Bottom
- A "t" transfer is created by the clashing of the last "t" in the last word in the Reverse Motto, Trust.
- Image 1 is a multiple clashed "t". While it certainly is a double clashed "t", it may actually be more than double clashed.
- Image 2 shows a clear double clashed "t".
"ST" TRANSFER
Comment Section
Top Bottom
- An "st" transfer is created by the clashing of the last two letters of the last word in the Reverse Motto, Trust.
- Image 1 and Image 2 are the same. The photograph that contains the arrows may be helpful to you in seeing this specimen's very faint "st" transfer. There are some VAM-12A specimens that may not contain an "st" transfer; however, these non-"st" specimens still retain VAM-12A status.
REVERSE LETTER TRANSFERS
The following photographs show Letter Transfers that clash events produce.
"E" TRANSFER
Comment Section
Top Bottom
- A partial or fully transferred E is seen below and to the left side of the Eagle's Tail Feathers. This raised feature is caused by the clashing of the E in the Obverse Legend, LIBERTY.
- The 1884-P VAM-2A contains a very clear E transfer. This is not always the case.
- These transfers may only contain the letter E, or a combination of the letters BERT. There are a number of BER transfer VAMs (1886-O VAM-1A, 1888-O VAM-1A, and the 1889-O, 1A2 for example). And, the BERT transfer is seen on the 1891-O VAM-1A1 through 1A4. In the case of the VAM 1A1 through 1A4, a portion of the transferred T is seen in the middle of the Eagle's Tail Feathers.
Comment Section
Top Bottom
- As you can tell, it is more difficult to see the partially transferred E in the case of the VAM-36A. I hope that the photograph containing arrows will be helpful in spotting the letter. The South pointing arrow marks the position of the middle serif of the E. The East pointing arrow marks the position of the vertical bar of the E.
"M" TRANSFER
Comment Section
Top Bottom
- The M transfer is created by the clashing of the Obverse Designer's Initial. The initial is found at the bottom back area of Lady Liberty's neck and above the first two digits of the Date.
- Another Designer's Initial is found on the Reverse. It's locate on the left side portion of the Wreath Bow just below the Eagle's 4th Tail Feather.
- Image 1 is a mid-range shot of the M transfer and Image 2 is a close-up shot of that letter transfer.
Comment Section
Top Bottom
- Images 3 and Image 4 are close-up shots taken at different angles. This M transfer is fairly easy to spot; many aren't. I find that taking a number of photographs at different angles helps me locate and photo-document a letter transfer.
OBVERSE CLASH MARKS
Nose-to-Chin Clash Marks.
Comment Section
Top Bottom
- These Nose-to-Chin clash marks were created by the clashing of Left Laurel Wreath Cluster #1. In some cases, the clash marks are the result of the clashing of Cluster #1 and Cluster #2.
- Laurel Wreaths are located on each side of the Eagle and both Wreaths contain 5 Clusters. Cluster #1 is at top of the Wreath and Cluster #5 is at the bottom.
Comment Section
Top Bottom
- As you can see, the Nose-to-Chin clash marks seen on this VAM are very similar to the clash marks found on the 1888-P VAM-11A. The difference is that the VAM-13A is a Double Clashed Morgan Variety.
- Please note the two black lines below Lady Liberty's Nostril. This indicates that during the time this die was being used in the minting process, it was damaged on two separate occasions; two clash events had occurred.
- As an Academic Aside: There may have been a way that the double clash mark was create by a single clash event. But until further research is conducted and a consensus is reached within the Morgan VAM Community, the status of the VAM-13A as a double clashed Variety has been officially established.
Phrygian Cap Clash Marks - Top Part of Cap.
Comment Section
Top Bottom
- Both of the Images show clash marks that were created by the clashing of Right Laurel Wreath Cluster #5 and #4; the Laurel Wreaths are located on the Reverse side of the Morgan.
Phrygian Cap Clash Marks - Middle Part of Cap.
Comment Section
Top Bottom
- Both of the Images show clash marks that appear on the same VAM, but taken from different angles. These clash marks were created by the clashing of Right Laurel Wreath Cluster #3, located on the Reverse side of the Morgan.
Phrygian Cap Clash Marks - Bottom Third Part of Cap.
Comment Section
Top Bottom
- Image 1 is an example of a multi-clashed Cap Vee area feature. The Die used to mint this Morgan shows that during the production life of the die, two clash events occurred. And, there are those who believe this feature was created by more than two clash events.
- Image 2 is an example of a single clashed Cap Vee area feature. The die used to mint this Morgan shows that during the production life of the Die, one clash event occurred.
- These clash marks were created by the clashing of Right Laurel Wreath Clusters #1 and #2, located on the Reverse side of the Morgan.
Chin-Jaw Clash Mark
Comment Section
Top Bottom
- A Chin-Jaw Clash Mark is created by the clashing of the Eagle's Right Outer Wing. The East facing arrow in Image 1 shows where that Clash Mark is positioned.
REVERSE CLASH MARKS
Laurel Wreath Clash Marks
Comment Section
Top Bottom
- As you will remember, Laurel Wreaths are located on each side of the Eagle and both Wreaths contain 5 Clusters. Cluster #1 is at top of the Wreath and Cluster #5 is at the bottom.
- Image 1 and Image 2 show the clash marks seen on Left Wreath Clusters #1 and #2 of a Single Clashed Morgan. The marks were created by the clashing of the area between Liberty's Nostril and Chin.
Comment Section
Top Bottom
- Image 3 and Image 4 show the clash mark seen on Right Wreath Clusters #1 and #2 of a Single Clashed Morgan. The marks were created by the clashing of the bottom third of the Phrygian Cap.
- This type of clash mark is sometimes called a "Bat-Wing" clash.
Comment Section
Top Bottom
- Image 1 and Image 2 show the clash marks seen on Left Wreath Clusters #1 and #2 of a Double Clashed Morgan. The marks were created by the clashing of the area between Liberty's Nostril and Chin.
Comment Section
Top Bottom
- Image 3 and Image 4 show the clash mark seen on Right Wreath Clusters #1 and #2 of a Double Clashed Morgan. The marks were created by the clashing of the bottom third of the Phrygian Cap.
Wing-to-Arrowhead Clash Marks
Comment Section
Top Bottom
- Image 1 and Image 2 show the clash marks seen between the Eagle's bottom Left Wing and the Arrow Heads. The marks were created by the clashing and transfer of the lower parts of the Cotton Bolls and their stems, which are located on the Obverse side of the Morgan above and to the right of Liberty's Ear.
- If these clash marks are present, an E transfer may have occurred. If not, the possibility of such a transfer is unlikely.
Comment Section
- Image 3 and Image 4 also show similar clash marks. Please remember to always look closely for an E transfer when these clash marks are present on your Morgan.
Top 


